Wednesday, April 6, 2011

Adobe Flash cs4

Here are some of the shortcut that always use.
Ctrl+z = undo ( edit> undo )
F5= insert frame ( insert> timeline> frame )
F6= insert keyframe ( insert> timeline> keyframe )
F8= convert to symbol ( modify> convert to symbol )

Add pictures/ sound/ any files, File> Import> Import to Library.
size of this file is 320 x 240 px. ( you may edit in on the properties)
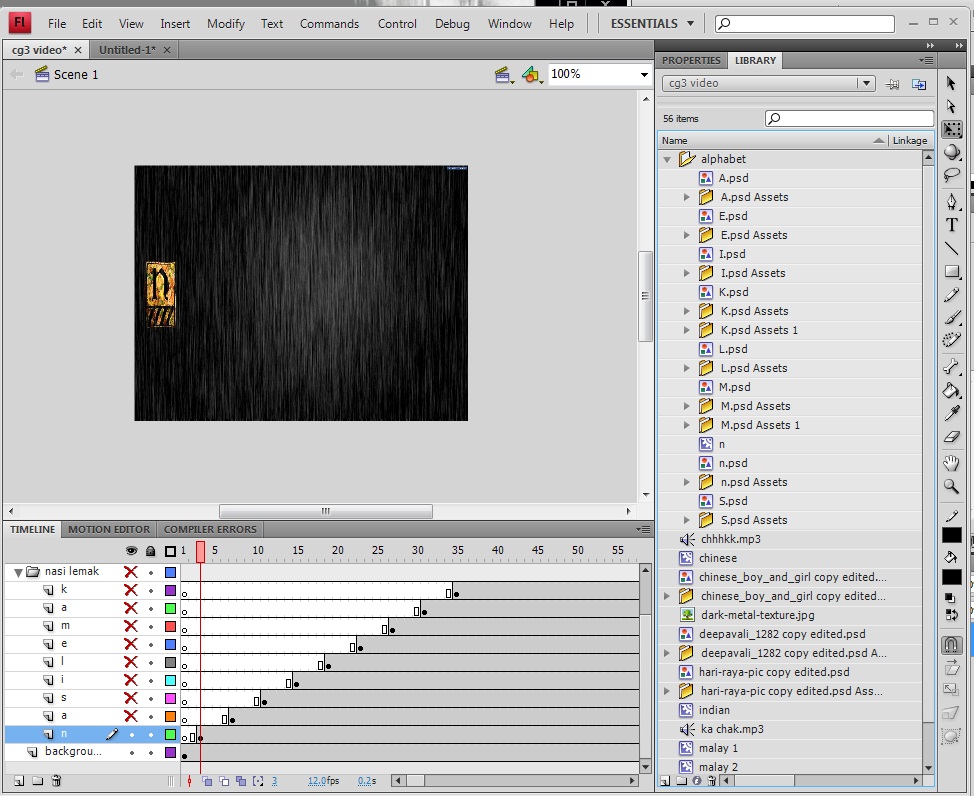
Import all the alphabets (psd file) to library. Drag the alphabet to scene and list it in layer by layer.
after drag to scene, convert to symbol (F8).
same action: import pictures to library> drag to scene> adjust the size> convert to symbol.
Then window> motion preset. Choose the preset.
then add sound effect on it. and it is done~ :D


The progress before start doing the video

Computer graphic 3 assignment 1 was about the 1 Malaysia poster.
And i have chosen the food as the theme for my poster.
This is the design.
(actually i did add a lot of typography inside which not just the nasi lemak. yet after i have consulted from lecturer before i start doing my video, she prefers just simple like this and add some pictures inside.)

And you must be curious just "nasi lemak" as simple as this "pop" it on the texture (background) and finish?
Why i choose "nasi lemak" is because, most of the malaysian likes to eat nasi lemak. Nasi lemak is one of the famous food in Malaysia. So i make it big at the center and inside the alphabets have some other famous food as well. (such as fried rice, satay, roti canai and teh tarik.)

Here goes to the making of my video:~

The font was I downloaded from internet. It's name is Boister Capitals.
Firstly, will be using Adobe Photoshop to do the words and editing the pictures.
*Remember(!)* have to do every single alphabet one by one. Not word by word~

HOW TO MAKE THE WORD AND THE PICTURE MERGE TOGETHER:
Type the alphabet, Highlight it and choose Boister Capitals.
*kindly remind* please use caps lock.
Adjust the font size.
File> Place> Select picture> PLACE
After place the picture, adjust it and put the layer of the picture on the layer of letter N.
Right click on the layer of the picture and click on the Rasterize Type.
After Rasterize Type, press Alt and click on between layer N and layer picture that "line".
Then the picture will merge together with the alphabet!
Same goes to the others.
Some of the alphabets which do not have picture merge together, 
will just as simple as changing the font type and adjusting the size only.

After finished the nasi lemak,
here comes the editing photos!

Open one of the picture which going to put inside the video later.
Unlock the layer by double clicking it, type a name then ok.
Right click on the layer, click Duplicate layer.
Click on the copy layer and click "edit in standard mode".

After that, click brush tool.
use the brush tool to "colour" the character.
Click on the quick mask mode again
click Select> Modify> Feather
Feather radius: 1 pixel

Select> Inverse
Add vector mask

Delete the 1st layer
Save as psd file.
Same goes to the other 3 pictures.
=)


Sunday, April 3, 2011

HERE GOES TO SEM 3

Hey guys! 
Now is my semester 3 and this semester i'm going to use more in Adobe Flash for my computer graphic 3 assignments.
This coming update will be my computer graphic 3 assignment 2.
It is about 1 Malaysia and i have chosen FOOD as my theme.
Thanks for reading! :D


Saturday, November 13, 2010

Wanted to change your lips colour?

Normally girls like to play make over.
But maybe you don't have the lip stick or lip gloss you want.
Never mind, PHOTOSHOP can help you solve this problem! ^^


Open and choose the photo that you want to edit the lips colour, right click the layer and click Duplicate layer.

Then select the quick mask tool.


click on the brush tool.


Now colour the part that you want to retouch. The mask will create a selection.

Click on the quick mask tool to create the selection.

click on the Rectangular Marquee Tool.

Right click on it and select inverse.

Right click again and select feather.

1 pixel is enough.

Then click on Image> Adjustment> Hue/ Saturation.

Adjust the colour that you want.

Use Rectangular Marquee Tool and click on the lips to dis-select the selection.

Lastly, use the blur tool the blur the lips outline to make it look more natural.

Here is the Before and After.


Thursday, November 11, 2010

Blurry image become SHARP!

Just realize that the photo you like is blur? But don't wish to delete it?
Never mind, PHOTOSHOP can solve your problem~!

1st of all, select your image.

Then right click on the layer and click on the Duplicate Layer.

Click Filter > Other > High Pass

Choose 10.0 pixel

**The higher the value you set, the sharper your image will be. If you set your image really high, the image will become grainy.

Now click on the layer and set the mode to Hard Light/ Linear Light/ Vivid Light to adjust the Opacity to make the image look best.

And now you can see the different between Before and After.
                                                          After                               Before

Now you have no worries on your blurry image! =)


Thursday, November 4, 2010

My E- Wallpaper by using layers

I have download few pictures from Google image.
But these pictures are different with what i have download before.
I just choose 2 pictures and combine together with typography for my Mid- Autumn Festival.

The lanterns

The moon

I crop the moon using crop tool and use the magic wand tool to edit the colour.

Use Paint Bucket Tool and choose the colour you want.

Rename the moon layer and drag it to the lanterns picture.
Use edit transform to adjust the size and the position that you want.

Then use Blur Tool to blur the moon.

I add typography inside by using vertical type tool.

To be honest, after i done all. Only i realize it isn't in A4 size.
How do i solve it?
I opened a new folder and choose 
International paper > A4 > change the width to 29.7cm and the height to 21cm
So the paper will be in landscape form.
Then I drag the lantern background to the A4 size paper and use edit transform to adjust the size.

* REMEMBER, if you haven't unlock the layer, rename the layer and it will be unlock! =)

After drag the background, next is the moon, then the typography.
Of course all need to be resize.

After all, it is Done!